
Tepte.com


If your PC feels sluggish during everyday tasks or struggles with modern games, simple hardware upgrades can make a big difference. Focusing on RAM, SSD, and graphics card improvements targets the most common bottlenecks. These upgrades deliver noticeable boosts in multitasking, boot times, and visual performance without breaking the bank. In this guide, we'll walk you through compatibility checks, essential tools, step-by-step installation, and fixes for common issues. Whether you're a first-timer or refreshing your setup, you'll find clear, practical advice to get your system running smoothly again.
Upgrading hardware isn't just for gamers—anyone dealing with slow load times or frozen apps can benefit. A quick RAM boost handles more browser tabs effortlessly, an SSD slashes startup delays, and a better graphics card sharpens video editing or casual gaming. Let's dive into each upgrade, starting with the basics every builder should know.
Success with any PC upgrade hinges on preparation. Rushing in without checking your current setup leads to frustration and wasted money. Begin by noting your motherboard model, power supply wattage, and case dimensions—these dictate what fits.
These steps prevent most headaches. Now, onto the upgrades.
RAM is your PC's short-term memory. When it's full, your system swaps data to the slower hard drive, causing lags. Doubling from 8GB to 16GB—or more—keeps things snappy for web browsing, photo editing, or light video work.
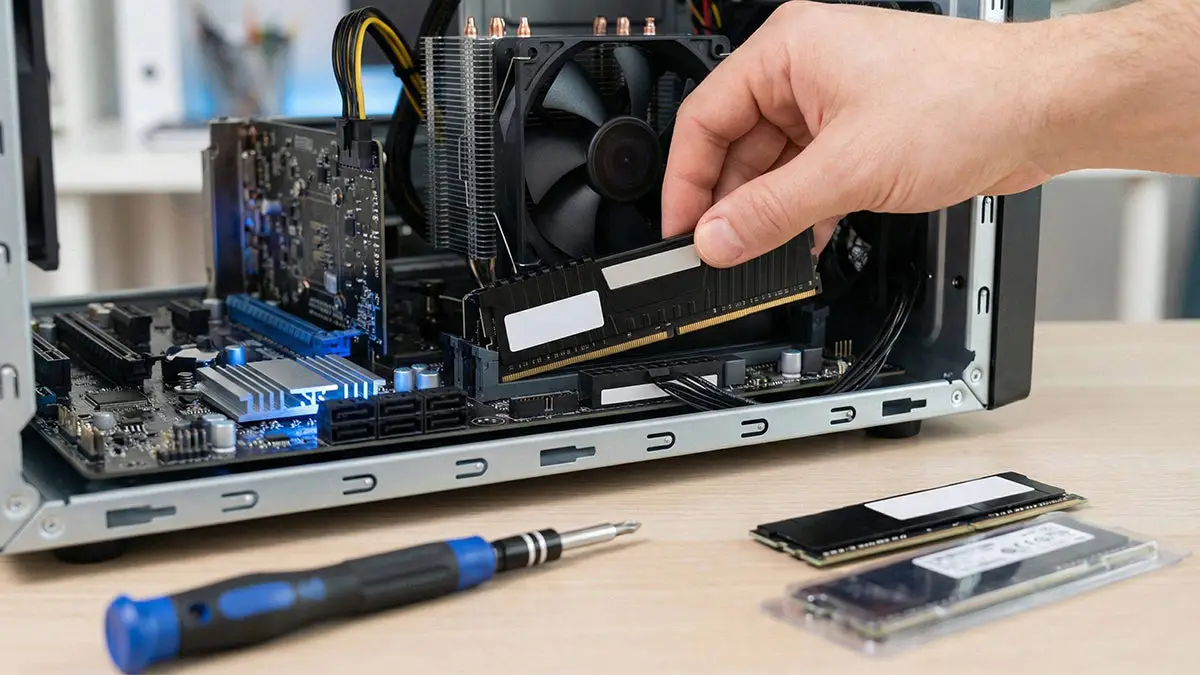
Not all RAM modules play nice together. Match DDR type (DDR4 or DDR5), speed (e.g., 3200MHz), and capacity per slot. Most motherboards have 2-4 DIMM slots; filling them in pairs optimizes performance via dual-channel mode.
| Motherboard Generation | Supported RAM Type | Max Capacity | Ideal Speed |
|---|---|---|---|
| Intel 10th/11th Gen | DDR4 | 128GB | 3200MHz |
| Intel 12th+ Gen | DDR5 | 192GB | 5600MHz |
| AMD Ryzen 3000/5000 | DDR4 | 128GB | 3600MHz |
| AMD Ryzen 7000+ | DDR5 | 192GB | 6000MHz |
This table covers popular platforms. Cross-reference with your motherboard manual for exact limits.
You'll need a Phillips screwdriver, anti-static strap, and optionally thermal pads if reseating the CPU cooler.
No POST? Reseat modules or try one stick. Beeps indicate slot issues—swap positions. Mismatched speeds default to the lowest, so uniform kits work best.
Traditional hard drives (HDDs) are mechanical and slow. An SSD uses flash memory for near-instant reads, cutting boot times from minutes to seconds and speeding app launches. Start with a 500GB-1TB NVMe model for most users.
Modern motherboards have M.2 slots for NVMe SSDs (PCIe fastest) or SATA ports. Check your manual for slot types and lengths (2280 is standard). Clone your old drive first to avoid reinstalling Windows.
Screwdriver set, SATA-to-USB adapter for cloning, and cloning software like Macrium Reflect (free).
For SATA SSDs, connect data and power cables like an HDD.
Not detected? Ensure BIOS SATA mode is AHCI. Secure the screw tightly—loose ones cause failures. If cloning fails, verify source drive health with CrystalDiskInfo.
"I once skipped backing up before an SSD swap and ended up with a bricked drive—lost two days of work. Always clone and test in a live environment first. It's a small step that saves huge headaches."—Tech enthusiast on Reddit, sharing a common rookie mistake
A dedicated graphics card (GPU) offloads rendering from your CPU, transforming gaming frames and creative workflows. Entry-level cards like RTX 3060 handle 1080p smoothly; mid-range excel at 1440p.
Confirm PCIe 3.0/4.0 x16 slot availability, PSU connectors (6/8-pin or 12VHPWR), and case length clearance (GPUs can exceed 300mm). Use PCPartPicker for automated checks.
Screwdriver, zip ties for cable management, and possibly a PCIe riser for tight cases.
Black screen? Check monitor cable to GPU, not motherboard. Crashes point to PSU underpowering—upgrade if below recommended. Artifacting means poor seating; reseat firmly.
After installation, update Windows and BIOS for optimal support.
With new RAM, SSD, and graphics card in place, fine-tune for peak efficiency. Run UserBenchmark to baseline scores, then optimize:
These tweaks squeeze extra FPS and responsiveness.
Budget wisely: 16GB DDR4 RAM runs $40-60, 1TB NVMe SSD $60-80, RTX 4060 GPU $300. Prioritize based on needs—SSD first for universal gains, then RAM, GPU last if visuals matter.
Monitor usage with HWMonitor: High RAM at 90%+? Upgrade it. Frequent disk thrashing? Go SSD. Low FPS in games? New graphics card.
These PC hardware upgrades—RAM, SSD, and graphics card—offer affordable paths to better performance. Follow the guides, double-check compatibility, and you'll enjoy a revitalized machine. If issues persist, local shops handle warranties without voiding them. Your faster PC awaits—get upgrading!
Published: Monday, January 19, 2026 Viewed 2 times.
tepte.com: Your Questions and Answers Resource with a Wealth of General Knowledge
Are you seeking a one-stop destination for comprehensive knowledge and answers to your burning questions? Look no further than tepte.com! Our platform is your go-to source for a wide range of information, all conveniently presented in an easily accessible question and answer format.
At tepte.com, we pride ourselves on being your reliable knowledge hub. Whether you're curious about technology, science, history, or any other subject under the sun, our extensive General Knowledge (GK) knowledge base has you covered. We've made it our mission to provide you with in-depth insights and facts on an array of topics. Read more
